How to fresh install LAMP ( Apache, MySQL 5.7+, PHP 5.6/7.0+) in Ubuntu 16.04+
Requisites
Before proceeding the requisites below run this:
sudo apt-get update
Then:
- Old installation of Apache, MySQL and PHP must be completely uninstalled from your system before you can use this tutorial. It is because they will interfere with the new installation process and can disrupt the installation. Please refer to these complete removal procedures if you have not done yet.
- You must be running Ubuntu 16.04 +. If you have not done so, upgrade your Ubuntu version to 16.04 LTS.
- You must have root access to your local Ubuntu server.
- Make sure you install this first:
sudo apt-get install software-properties-common python-software-properties
- Verify if you have rpl installed. You can run this command to find out:
which rpl
If it does not exist, then install it with:
sudo apt-get install rpl
sudo apt-get install git
Target audience and scope of this tutorial
- Servers that uses Ubuntu 16.04+ as their operating system.
- This tutorial will install latest Apache2.4+, MySQL 5.7+ and PHP 5.6, 7.0 and 7.1 FPM in your Ubuntu local server. If you are wanting to install a different versions for any of these, this not for you.
- This tutorial assumes that you would like to have your Apache website root directory inside your Ubuntu home directory. e.g.
/home/emerson/sourcecode/
- This tutorial assumes that you would like to run Apache and run PHP as your username. This will ease the permission in your end.
- This tutorial uses PHP FPM (FastCGI Process Manager) as the PHP handler for installation. This is one of the recommended PHP handlers to use with PHP 5.6 and 7.0.
- This tutorial is intended to be used in VPS or dedicated server environment only. This is not advisable to used for any other type of hosting setup. In production server environment, you need to configure per user per website FPM pool. This tutorial assumes this is only run in your local environment only, so a single user configured for your entire development sites makes sense.
- This will install 3 PHP versions in your Ubuntu 16.04+ server. By default, it will use PHP 7.0. But it can be switched to either PHP 5.6 or even PHP 7.1. If you are only looking to install a single PHP version, this tutorial is not for you.
- For working with MySQL databases, phpMyadmin is also installed.
Note: If your needs does not fall within the scope of this tutorial, then please don’t run the installation procedures!
Installation Procedures
- Clone the installation scripts in your desktop (if you have not done so):
git clone https://github.com/codex-m/ubuntu-lampp-server-scripts.git
- Go inside the server scripts directory:
cd ubuntu-lampp-server-scripts
- Make sure all installation scripts are executable.
sudo chmod +x *.sh
- Login as root
sudo -s -H
- Run the installation script with parameters to your Ubuntu home directory and your Ubuntu username
Format:sh install_lampp_ubuntu.sh [your website home directory inside your Ubuntu home directory] [your Ubuntu username]
For example, if I would like to have my Apache website root directory in this path (make sure to add a trailing slash at the end):
/home/emerson/sourcecode/
And my Ubuntu username is:
emerson
Then this is the final installation command to run:
sh install_lampp_ubuntu.sh /home/emerson/sourcecode/ emerson
- What you will do now is to simply press ‘Enter’ key if it asks for verification to use a PPA in order to proceed.
- If it will ask you to enter MySQL password, please do so.
- If it ask for your permission to proceed to downloading/installing packages, simply type ‘Y’ to proceed.
- When it ask you to choose the server type when installing phpMyadmin. Select ‘Apache’
- When it ask you to whether configure dB for common. Select yes and enter your phpMyadmin password.
- That’s it the installer will do the rest automatically. This can take some time to complete so please patient.
- When it’s all completed, reboot your server via your VPS control panel provided by your host.
How to test if your installation is working
- Create a PHP script inside your Apache website root directory e.g. ( /home/emerson/sourcecode/ ) with this code:
<?php
echo 'You are viewing the phpinfo in your home directory.';
echo phpinfo();
?>
- Save the script as phpinfo.php
- Run the phpinfo script in your browser like this.
http://localhost/phpinfo.php
- You should see the output of your phpinfo like this:
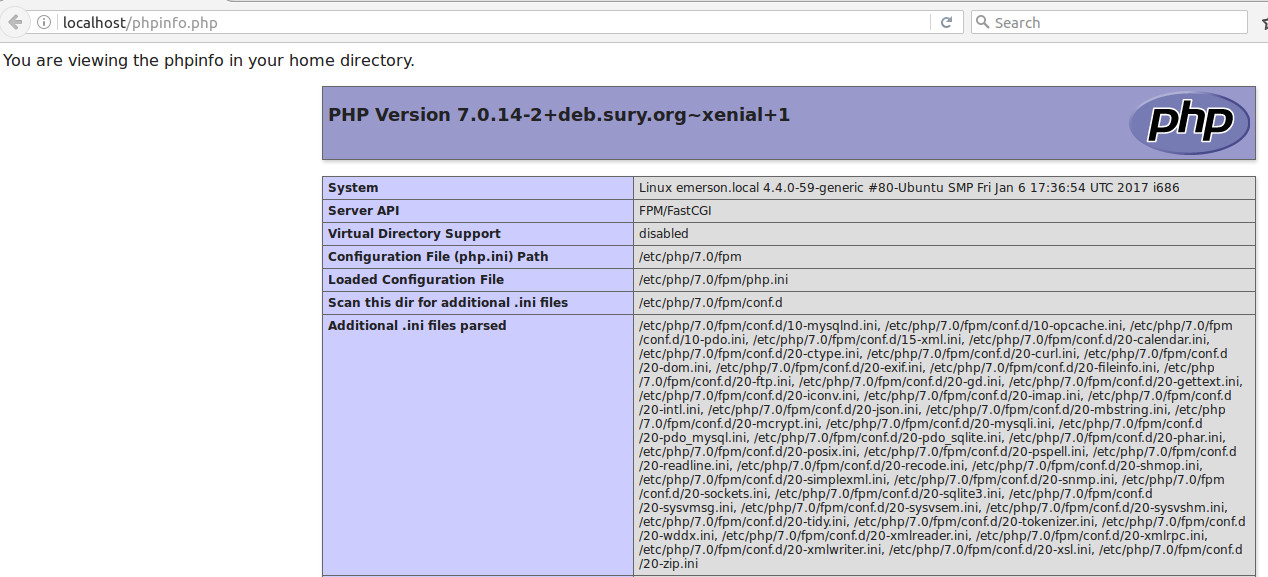
- PHP version by default should be 7.0
- The server API should be using FPM/FastCGI
- When you see ‘You are viewing the phpinfo in your home directory.‘ This means that the Apache website directory inside your Ubuntu home directory is working.
- Run this in the browser URL: http://localhost/phpinfo.php#module_mysqli
This will output a section like this:
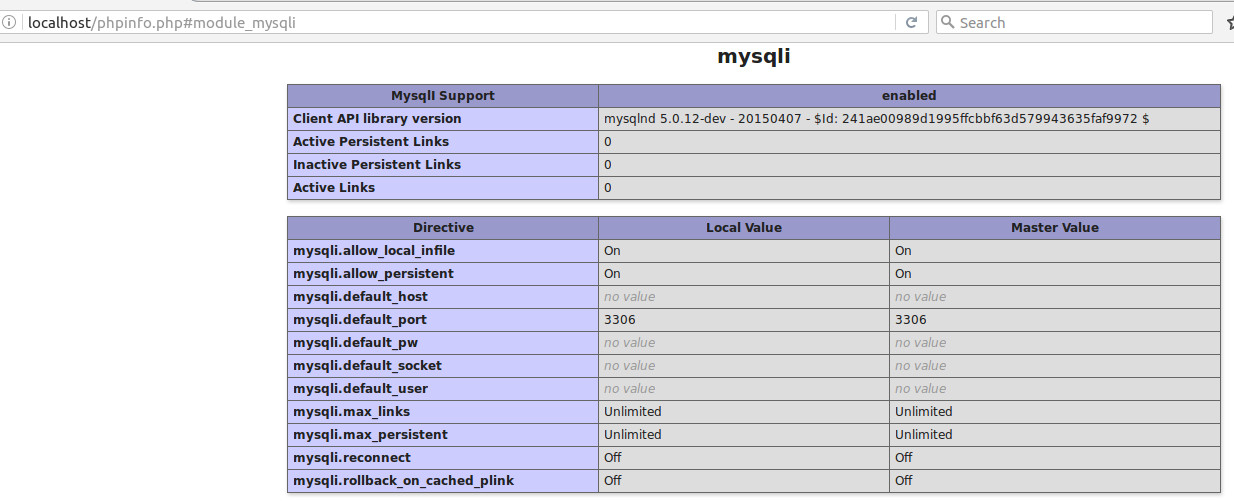
If you see this, your PHP and MySQL will work OK together. - Now go to this URL: http://localhost/phpmyadmin/ It should load your phpMyadmin login page. If you see the login page, then your phpMyadmin is working. Login using your root MySQL username and password.
- After logging in, you should be able to see your databases and some information under ‘Database server‘. Your MySQL server version should be 5.7+.
- Now create a PHP script called whomi.php. Put this code inside this script:
<?php
echo 'whoim = '.exec('/usr/bin/whoami');
?>
And put this script in your Apache website directory in the same path as phpinfo.php
- Run the script in the browser like http://localhost/whomi.php
It should output your Ubuntu username. This means that you are running the PHP script as your Ubuntu username.
whoim = emerson
If you see all of these, congratulations you have successfully installed LAMPP in your local Ubuntu server.
Switching PHP versions after Installation
- Go inside the server scripts directory:
cd ubuntu-lampp-server-scripts
- Make sure all installation scripts are executable.
sudo chmod +x *.sh
- Login as root
sudo -s -H
- Make sure your ‘exactly‘ know your current PHP version. Always run the phpinfo.php before switching versions so you are sure of your current PHP version.
- The format for switching PHP version is:
sh switch_php_version.sh [current_php_version] [target_php_version]
Where [current_php_version] and [target_php_version] can be one of these possible values: 5.6, 7.0, 7.1
- Assuming your current PHP version is 7.0 and you should like to downgrade to 5.6. Then this is the switching command:
sh switch_php_version.sh 7.0 5.6
- After running this command, run your phpinfo again and the PHP version will be switched your target version
Other examples:
Switch from PHP 5.6 to PHP 7.0:
sh switch_php_version.sh 5.6 7.0
Switch from PHP 7.0 to PHP 7.1
sh switch_php_version.sh 7.0 7.1
Switch from PHP 7.1 to PHP 5.6
sh switch_php_version.sh 7.1 5.6
When doing this, you don’t need to touch anything that is related to your database or Apache settings or any other settings. All you need to do is to run the switch_php_version.sh script.
That’s it! All settings are configured automatically and you don’t need to restart 🙂
Maintaining your local LAMPP installation
- Never downgrade to unsupported PHP and MySQL versions.If you are now in Ubuntu 16.04, the supported MySQL version is 5.7+ and 5.6/7.0/7.1 for PHP. Don’t downgrade to older MySQL or PHP versions. This is not to say that this is impossible. But doing this can most likely affect the stability of your installation.
- As time goes by, Ubuntu prompts an update for your successfully installed software (e.g. Apache 2.4+/MySQL 5.7+, PHP 5.6/7.0 and 7.1). Please make sure you run this update security and stability. But when doing this update, make sure to select ‘N’ when the update attempts to override your existing working configuration. For example it will ask you if you would like to the new update to override your (this is an example) /etc/php/7.0/fpm/pool.d/www.conf. Simply select ‘N’ to all choices so your existing configuration will not be overwritten.